Before and After: An Evergreen Deck Restoration
The short versionAn Evergreen family had an elevated deck over a walk-out patio they could not use, because every rain and snowmelt dripped straight through. They tarped it for three years. We installed a custom underdeck ceiling with hidden drainage and two flush LED downlights in three days, and turned that dead zone into 780 square feet of dry, year-round outdoor living space.
Some projects are about adding something new. This one was about reclaiming something the homeowner already had and could not use. The deck was fine. The space underneath it was the whole problem.
Before: a patio nobody could sit on
The home sits on a slope in Evergreen, with an elevated deck off the main level and a walk-out basement opening onto a lower patio. On paper, that lower patio should have been the best spot on the property: shaded, private, with a slider leading right out to it.
In practice, it was unusable. The deck boards above were in decent shape, but a deck is not a roof. Every rainstorm and every round of snowmelt found the gaps between the boards and dripped straight down onto the patio. Furniture stayed wet. The slider stayed shut.
The family had tried to solve it themselves. For three years, they ran a tarp across part of the underside, the kind of fix that looks temporary because it is. It sagged, it pooled water, and it did nothing for the rest of the space. By the time they called us, they had mostly given up on the lower level.
The walk: what we found
Every project starts with us walking the site, and this one had a few wrinkles worth working through before we drew anything.
First, the framing. We got under the deck and checked the joists and ledger, because there is no point installing a ceiling under a structure that has issues of its own. The framing was solid, which made the rest of the plan straightforward.
Second, the drainage slope. An underdeck ceiling works by catching the water that comes through the deck boards and channeling it away on a built-in slope, so it never reaches the space below. The question on any install is always where that water finally exits, and that depends on the lay of the land and the foundation.
Third, the downspout. Given where the foundation sat, we could not just dump the collected water against the house. We routed the channel to carry it out to a downspout placed clear of the foundation, so the fix did not trade a wet patio for a wet basement wall.
The design decisions
With the structure and drainage sorted, the rest came down to choices the homeowner got to make.
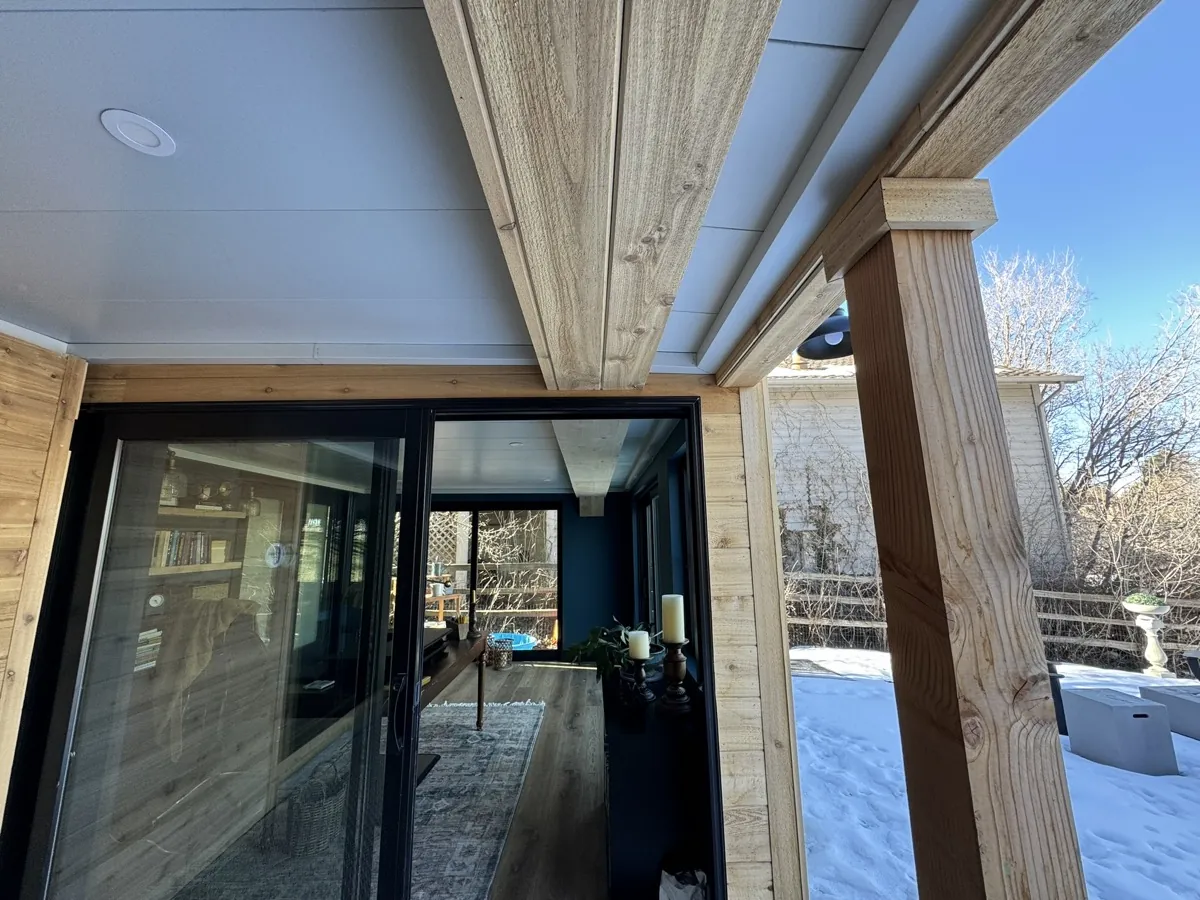
We selected a panel color that read clean against the home’s exterior, neither stark white nor anything that would yellow and date. There was a stone retaining wall along one side of the patio, which made the gutter routing a bit more deliberate. We ran the channel so the collected water cleared the stone instead of staining it, which is the kind of detail that does not show up in a brochure but shows up every time it rains.
The homeowner also wanted to use the space in the evening, so we added two flush LED downlights set into the new ceiling. Recessed, low-profile, no dangling fixtures, just a soft wash of light that turns the patio into a place you would actually linger after dark.
A deck keeps the sun off. An underdeck ceiling keeps everything off, and gives you the room back.
The install: three days
This was a clean three-day project, which is typical for a job this size with no structural surprises.
Day one was framing and the drainage channel. We built the framing that carries the ceiling and set the slope that moves the water, getting the bones of the system in place.
Day two was panels and the electrical rough-in. The ceiling panels went up, and we ran the wiring for the two downlights while the ceiling was still open and easy to work in. Doing the electrical at this stage, rather than after, is the difference between a clean install and a patch job.
Day three was finishing and lighting. We closed everything up, set and aimed the downlights, and walked the whole system to confirm the drainage ran clean and the finish was tight. Total, three days from a dripping tarp to a finished room.
After: 780 square feet they get to keep
The result was 780 square feet of covered outdoor space that stays dry through rain and snow. The basement slider that had stayed closed for three years now opens onto a patio the family uses year-round.
The homeowner told us they had not used the lower patio in three years. The week after we finished, they had family over for dinner outside. That is the whole job, really. It was never about the ceiling. It was about getting the room back.

What a project like this costs in Evergreen
A restoration of this scope in the Evergreen area generally lands in the range of 18,000 to 28,000 dollars, depending on the finish level, the lighting and accessories, and how involved the drainage routing gets. The honest answer to “what will mine cost” comes after we walk it, because the site drives the number more than the square footage does.
Why Evergreen installs run a little different
Mountain-town work is not the same as suburban Front Range work, and we plan for the differences.
- Access. Getting a crew and materials up winding mountain roads takes more staging than a flat suburban driveway. We account for it so the schedule holds.
- Debris load. Evergreen properties live under pine and aspen, which means more needles, leaves, and seed drop landing on the deck and into the drainage. We build with that ongoing load in mind so the channels keep flowing.
- A longer covered season. Cooler mountain temperatures mean a covered, dry patio is genuinely usable across more of the year than a comparable space down the hill. The investment earns more days back.
Common questions
Will an underdeck ceiling really keep the patio dry?
Yes. The system catches the water that comes through the deck boards above and carries it away on a built-in slope to a downspout placed clear of the foundation. Done right, the space below stays dry through rain and snowmelt, which a tarp never manages.
How long does a project like this take?
This Evergreen job was three days: framing and drainage on day one, panels and electrical rough-in on day two, finishing and lighting on day three. A straightforward install with no structural surprises usually runs in that range.
Can you add lighting to an underdeck ceiling?
We can, and it is easier to do during the install than after. We run the wiring while the ceiling is still open, then set recessed, low-profile downlights into the finished panels. This project got two flush LED downlights for evening use.
What does a restoration like this cost in Evergreen?
A project of this scope generally runs 18,000 to 28,000 dollars depending on finish level, lighting, and drainage complexity. The site drives the number, so we give you a real figure after we walk it. There is no charge for that walkthrough.
Do mountain properties need anything different?
They do. We plan for tighter road access, the heavier debris load from pine and aspen, and the longer covered season that cooler temperatures give you. The system is the same quality everywhere; the planning around it adjusts to the site.
Got a space you have stopped using?
If there is a patio under your deck you have given up on, we would like to see it. Twenty-two years of Colorado installs, employee-owned, lifetime warranty. We will walk it with you and tell you exactly what is possible.