
Home / Service Areas / Dakota Ridge / Enclosure-Ready Systems
Enclosure-Ready Ceilings: Dry It Now, Close It In Later
Screens, a 3-season room, a 4-season room, a sunroom. Every one of them depends on a ceiling that keeps the water out. We build that ceiling under your deck first, and plan it around whatever walls you might add next spring or ten years from now.
Order
Walls built under a leaking deck just trap the water inside
Every enclosure under a deck shares one weak point, and it sits overhead. Deck boards are gapped on purpose so the surface sheds water, which means whatever lands on the deck eventually comes through. Leave that open, add walls, and the water still arrives. It simply has nowhere to go, and now it lands on drywall, window trim, a rug or a couch.
So our work starts at the ceiling. A structural galvanized steel system catches what drips through, carries it to the perimeter and sends it down a downspout. That turns an exposed patio into a dry, controlled space that can actually be built around, and whatever enclosure follows inherits a sound roof the day it goes in.
The ceiling also stays put while the room grows around it. Panels hold their shape over time, and the system stays accessible for inspection and maintenance even after screens or walls are added.
Every enclosure under a deck shares one weak point, and it sits overhead.
Three walls in and one side open: most of a room already
The photo at the top of this page shows a space we see under plenty of walkout decks. Gray lap siding closes it on three sides. There is a window, a sliding door into the lower level and a white panel ceiling overhead, with white trim posts along the open side and a wood deck stair past them.
A bay like that is closer to an enclosure than it looks. The house already supplies most of the walls, and the deck supplies the roof structure. What the open side needs depends on where you want to end up. Screens keep the bugs out and let the air through. Window systems turn it into a 3-season room. A fully enclosed build with more insulation gets you year-round use.
Look at how much is already finished in that frame. The window and the slider are in, the siding is done, and the ceiling is up and draining. Whoever closes the fourth side later starts from a dry opening framed by posts, which is about the easiest starting point an enclosure can have.
None of those can supply the dry ceiling on their own. Get that piece right first, and the open side becomes a decision you make on your own schedule.
Four places the space can go from here
Each one starts with the same requirement, a dry and protected space, and each asks something a little different of the plan.
Not sure which one fits? Put the ceiling in and live with the space for a season. How your family actually uses it usually answers the question for you.
Screened-in
The simplest way to define the space and keep the airflow. Screens keep bugs and debris out, hold onto that open outdoor feel, and can go in whenever you are ready for them. For many homeowners this is the first step after the ceiling.
3-season room
Built for spring, summer and fall, with protection from rain and wind and open or flexible window systems. Good for dining and relaxing while you stay connected to the yard.
4-season room
Fully enclosed, with more insulation and weather protection, and able to support heating. A consistent, dry ceiling matters most here, since everything below it is meant to last for decades.
Sunroom or hybrid
Glass, screens and structural elements mixed together, with the emphasis on natural light. The ceiling finish turns into one of the main things you look at, so the color choice counts.
Settle these before the first panel is ordered
If there is any chance the space gets enclosed someday, plan for it now. Each item below is easy to decide on paper and painful to change once the ceiling is finished.
- Posts and wall lines. During design we can account for attachment points for future walls or framing, so the ceiling is ready to receive them.
- The downspout route. Drainage gets placed where it will not cut across a future wall, window or door opening.
- Outlets and switch boxes. Lighting, heaters and outlets get planned along with the ceiling, because running wire is far simpler before a room has walls.
- Header height and door swing. How tall the opening runs and which way a door opens both affect where a downspout or a fixture can sit.
- Load and finishes. Heavier finishes or added structure get considered at the start.
Bring photos of rooms you like, or a rough sketch of where a door might go. Nothing has to be final. We only want the ceiling plan to leave room for the version you have in mind, so a downspout never lands where your future door wants to swing.
Paperwork, then a date
If your neighborhood reviews what goes under a deck, we hand over color samples, spec sheets and the engineering documents for the application, and none of it adds to your bill.
A written quote comes before any order is placed, followed by a firm date we both sign off on. After delivery, our own crew usually needs three to five working days.
Plan the Walls With UsMidway
One patio, photographed halfway through the job
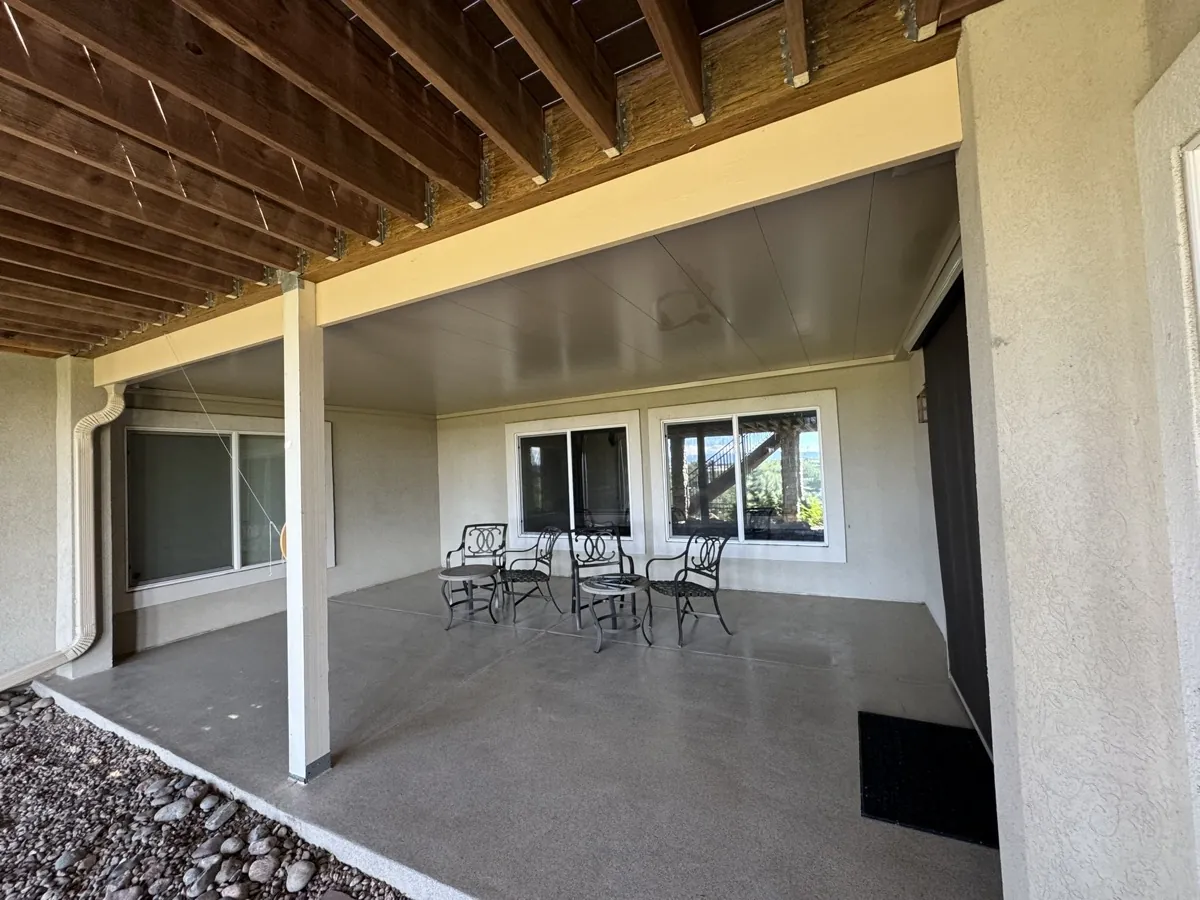
The second photo on this page was taken partway through an install, and it makes the argument better than we can. On the left, bare wood joists are still exposed, with every gap in the boards above them open to the sky. Over the rest of the patio the pale ceiling is finished, with a white post and a downspout taking the water down to the floor.
Picture walls going up around the left half of that photo. The framing would keep dripping, the concrete would keep staining, and the new walls would take the runoff. Now picture screens or glass around the right half. That is the version that holds up.
The four iron bistro chairs already show how the space wants to be used. More on how the ceiling supports whatever comes next is on our enclosure-ready underdeck systems page.
Questions about closing it in someday
Can we put the ceiling in now and enclose the space years later?
Yes, and that is how it usually goes. Screens, walls and other finish elements can be added over time. We plan attachment points, drainage routing and wiring during design so the ceiling is ready the day you are, and nothing finished has to come back down.
Should we plan for a 3-season or a 4-season room?
That depends on when you want to use it. A 3-season room covers spring through fall, with protection from rain and wind. A 4-season room is fully enclosed, with more insulation, and can support heating for year-round use. Both start from the same dry ceiling, so you can decide later.
Can the ceiling still be reached once walls are up?
Yes. The system stays accessible after screens, glass or walls are added, so inspection and maintenance still happen from below. Panels come out without damage, which also means wiring can change later if the finished room turns out to need another light or an extra outlet.
Will our HOA need anything from you?
If your neighborhood has guidelines for work under a deck, we prepare the engineering documents, spec sheets and color samples a submittal usually asks for, at no extra cost. Bring the guidelines along to the walkthrough and we will work them into the plan from the start.
How does the steel hold up once the space is closed in?
Each steel component is hot-dip galvanized against corrosion, then coated on both faces through a controlled paint process and topped with a 5 mil polyurethane finish for lasting color. The panels keep their shape over time, so the ceiling still looks right as walls and furniture fill in around it.
Ready to plan it? Tell us about the deck, call (303) 481-1967, or look through the completed project gallery. If evenings under the new ceiling are the priority, premium accessories in Dakota Ridge covers lights, fans and heat. For a patio with nothing above it, see Dakota Ridge pergola drainage systems.
Ceilings going up across our home county
Dakota Ridge sits in West Jefferson County, which is our home county, and every job here runs out of the Wheat Ridge shop. Most enclosure projects begin with standard Dakota Ridge underdecking, and shared buildings run through commercial underdecking for Dakota Ridge communities. Everything we offer locally is on the Dakota Ridge service area page, and the rest of the county is on our Jefferson County page.
